爬虫是什么
爬虫的本质:模拟浏览器打开网页,捕获网页中我们想要的那部分数据。
入门:爬虫是一种自动抓取互联网信息的程序或脚本。主要用于搜索引擎,对一些网站的数据进行大量解析和收集。简单的爬虫程序通过request模块几行就可以对收据进行批量收集,,
进阶学习:想要学习好并没有那么简单。它关系到了计算机网络,前端开发,后端编程。对于爬取到的数据进行存储还需要学习数据库,对于有反爬措施的网站还需要进行反反爬,逆向等。为了能快速准确的采集到我们需要的数据,爬虫的核心在于并发和逆向,这将大大提高我们的效率。在人工智能时代,模型的训练是需要大量数据的,爬虫与机器学习,数据分析更是有密不可分的关系。
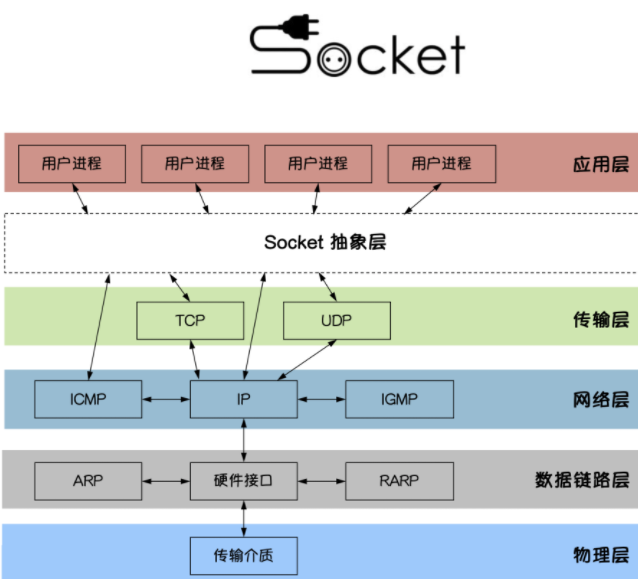
网络基础 http协议
简介
HTTP协议是Hyper Text Transfer Protocol(超文本传输协议)的缩写,是用于万维网(WWW:World Wide Web )服务器与本地浏览器之间传输超文本的传送协议。HTTP是一个属于应用层的面向对象的协议,由于其简捷、快速的方式,适用于分布式超媒体信息系统。它于1990年提出,经过几年的使用与发展,得到不断地完善和扩展。HTTP协议工作于客户端-服务端架构为上。浏览器作为HTTP客户端通过URL向HTTP服务端即WEB服务器发送所有请求。Web服务器根据接收到的请求后,向客户端发送响应信息。
http协议的特性
基于TCP/IP协议
http协议是基于TCP/IP协议之上的应用层协议。
基于请求-响应模式
HTTP协议规定,请求从客户端发出,最后服务器端响应该请求并返回。换句话说,肯定是先从客户端开始建立通信的,服务器端在没有接收到请求之前不会发送响应
无状态保存
HTTP是一种不保存状态,即无状态(stateless)协议。HTTP协议自身不对请求和响应之间的通信状态进行保存。也就是说在HTTP这个级别,协议对于发送过的请求或响应都不做持久化处理。
使用HTTP协议,每当有新的请求发送时,就会有对应的新响应产生。协议本身并不保留之前一切的请求或响应报文的信息。这是为了更快地处理大量事务,确保协议的可伸缩性,而特意把HTTP协议设计成如此简单的。
短连接和长连接
HTTP1.0默认使用的是短连接。浏览器和服务器每进行一次HTTP操作,就建立一次连接,任务结束就中断连接。
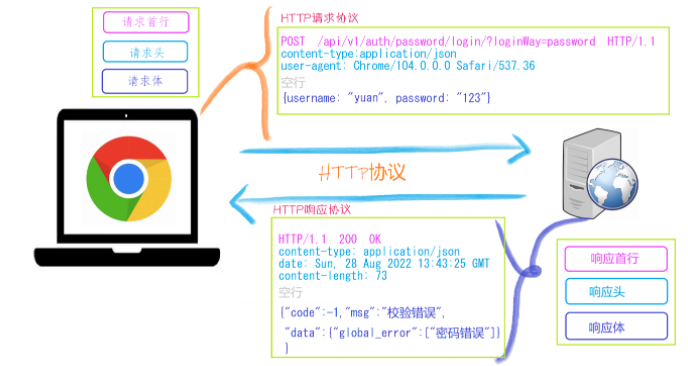
http请求协议与响应协议
http协议包含由浏览器发送数据到服务器需要遵循的请求协议与服务器发送数据到浏览器需要遵循的请求协议。用于HTTP协议交互的信被为HTTP报文。请求端(客户端)的HTTP报文 做请求报文,响应端(服务器端)的 做响应报文。HTTP报文本身是由多行数据构成的字文本。
一个完整的URL包括:协议、ip、端口、路径、参数
例如: https://www.baidu.com/s?wd=yuan 其中https是协议,www.baidu.com 是IP,端口默认80,/s是路径,参数是wd=yuan
请求方式: get与post请求
GET提交的数据会放在URL之后,以?分割URL和传输数据,参数之间以&相连,如EditBook?name=test1&id=123456. POST方法是把提交的数据放在HTTP包的请求体中.
GET提交的数据大小有限制(因为浏览器对URL的长度有限制),而POST方法提交的数据没有限制
响应状态码:状态码的职 是当客户端向服务器端发送请求时, 返回的请求 结果。借助状态码,用户可以知道服务器端是正常 理了请求,还是出 现了 。状态码如200 OK,以3位数字和原因组成。
浏览器开发者工具
在网页时通过F12即可进入开发者模式。
前端基础 数据解析 正则表达式 Regular Expression,译作正则表达式或正规表示法,表示有规则的表达式,正则表达式就是描述一段文本排列规则的表达式。
正则表达式是用于处理复杂文本信息的强大的高级文本操作工具。正则表达式拥有自己独特的规则语法以及一个独立的正则处理引擎,我们根据正则语法编写好规则(模式)以后,引擎不仅能够根据规则进行模糊文本查找,还可以进行模糊分割,替换等复杂的文本操作,能让开发者随心所欲地处理文本信息。正则引擎一般由编程语言提供操作,像python就提供了re模块或regex模块来调用正则处理引擎。
这是一套独立的编程语言,我们学习python的正则以后,也可以在java,php,go,javascript,sql等编程语言中使用。
正则对字符串或文本的操作,无非是分割、匹配、查找和替换。
在线测试工具 http://tool.chinaz.com/regex/
元字符(Metacharacters)
元字符是具有特殊含义的字符。
元字符
描述
. 叫通配符、万能通配符或通配元字符,匹配1个除了换行符\n以外任何原子
[] 匹配一个中括号中出现的任意原子
[^原子] 匹配一个没有在中括号出现的任意原子
+ 叫加号贪婪符,指定左边原子出现1次或多次
*****
叫星号贪婪符,指定左边原子出现0次或多次
? 叫非贪婪符,指定左边原子出现0次或1次
{n,m} 叫数量范围贪婪符,指定左边原子的数量范围,有{n},{n, }, {,m}, {n,m}四种写法,其中n与m必须是非负整数。
^ 叫开始边界符或开始锚点符,匹配一行的开头位置
$ 叫结束边界符或结束锚点符,匹配一行的结束位置
| 指定原子或正则模式进行二选一或多选一
() 对原子或正则模式进行捕获提取和分组划分整体操作,
*\*
转义字符,可以把原子转换特殊元字符,也可以把特殊元字符转成原子。
1
2
3
4
5
6
7
8
9
10
11
12
13
14
15
16
17
18
19
20
21
22
23
24
25
26
27
28
29
30
31
32
33
34
35
36
37
38
import re"""re.findall(正则模式, 文本) 基于正则模式查找所有匹配的文本内容""" ret1 = re.findall("a" , "a,b,c,d,e" ) ret1 = re.findall("." , "a,b,c,d,e" ) ret2 = re.findall("[0-9a-zA-Z]" , "apple,banana,orange,melon" ) ret2 = re.findall("\w" , "apple,banana,orange,melon" ) ret2 = re.findall("\w+" , "apple,banana,orange,melon" ) ret2 = re.findall("\w+?" , "apple,banana,orange,melon" ) ret2 = re.findall("\w*" , "apple,banana,orange,melon" ) ret2 = re.findall("\w{6}" , "apple,banana,orange,melon" ) ret3 = re.findall("^\w{5}" , "apple,banana,peach,orange,melon" ) ret3 = re.findall("\w{5}$" , "apple,banana,peach,orange,melon" ) ret3 = re.findall("^\w{5}$" , "apple,banana,peach,orange,melon" ) print (ret3)ret4 = re.findall(",\w{5}," , ",apple,banana,peach,orange,melon," ) ret4 = re.findall(",(\w{5})," , ",apple,banana,peach,orange,melon," ) ret4 = re.findall("\w+@\w+\.com" , "123abc@163.com,....234xyz@qq.com,...." ) ret4 = re.findall("(\w+)@qq\.com" , "123abc@163.com,....234xyz@qq.com,...." ) ret4 = re.findall("(?:\w+)@(?:qq|163)\.com" , "123abc@163.com,....234xyz@qq.com,...." ) print (ret4)""" \b 1个单词边界原子 """ txt = "my name is nana. nihao,nana" ret = re.findall(r"na" , txt) ret = re.findall(r"\bna" , txt) ret = re.findall(r"\bna\w{2}" , txt) print (ret)
转义元字符是\开头的元字符,由于某些正则模式会在开发中反复被用到,所以正则语法预定义了一些特殊正则模式以方便我们简写。
元字符
描述
示例
\d 匹配一个数字原子,等价于[0-9]。
\d
\D
匹配一个非数字原子。等价于[^0-9]或[^\d]。
“\D”
\b
匹配一个单词边界原子,也就是指单词和空格间的位置。
er\b
\B
匹配一个非单词边界原子,等价于 [^\b]
r”\Bain”r”ain\B”
\n 匹配一个换行符
\t
匹配一个制表符,tab键
\s 匹配一个任何空白字符原子,包括空格、制表符、换页符等等。等价于[ \f\n\r\t\v]。
“\s”
\S
匹配一个任何非空白字符原子。等价于[^ \f\n\r\t\v]或 [^\s]。
“\S”
\w 匹配一个包括下划线的单词原子。等价于[A-Za-z0-9_]。
“\w”
\W
匹配任何非单词字符。等价于[^A-Za-z0-9_] 或 [^\w]。
“\W”
注意:python本身没有内置正则处理的,python中的正则就是一段字符串,我们需要使用python模块中提供的函数把字符串发送给正则引擎,正则引擎会把字符串转换成真正的正则表达式来处理文本内容。
re模块中的常用函数 re模块提供了一组正则处理函数,使我们可以在字符串中搜索匹配项:
函数
描述
findall 按指定的正则模式查找文本中所有符合正则模式的匹配项,以列表格式返回结果。
search 在字符串中任何位置 查找首个符合正则模式的匹配项,存在则返回re.Match对象,不存在返回None
match 判定字符串开始位置 是否匹配正则模式的规则,匹配则返回re.Match对象,不匹配返回None
split 按指定的正则模式来分割字符串,返回一个分割后的列表
sub 把字符串按指定的正则模式来查找符合正则模式的匹配项,并可以替换一个或多个匹配项成其他内容。
如果一个正则表达式要使用几千遍,每一次都会编译,出于效率的考虑进行正则表达式的编译,就不需要每次都编译了,节省了编译的时间,从而提升效率
对于多次使用正则表达式,每一次编译都会浪费时间,为了提高效率,使用compile,不用每次都编译
compile()
1
2
3
4
5
6
import rere_email = re.compile (r"(?:\+86)?1[3-9]\d{9}" ) ret = re_email.findall("15100649928,123@qq.com,13653287791,666@163.com" ) print (ret)
如果一个正则表达式要使用几千遍,每一次都会编译,出于效率的考虑进行正则表达式的编译,就不需要每次都编译了,节省了编译的时间,从而提升效率
正则进阶 .*?1 2 3 4 5 6 7 8 9 10 11 import retext = '<12> <xyz> <!@#$%> <1a!#e2> <>' ret = re.findall("<\d+>" , text) ret = re.findall("<\w+>" , text) ret = re.findall("<.+>" , text) ret = re.findall("<.+?>" , text) ret = re.findall("<.*?>" , text) print (ret)
模式修正符,也叫正则修饰符,模式修正符就是给正则模式增强或增加功能的。
通用flags(修正符)
值
说明
re.I
是匹配对大小写不敏感
re.L
做本地化识别匹配
re.M
多行匹配,影响到^和$
re.S
使.匹配包括换行符在内的所有字符
re.U
根据Unicode字符集解析字符,影响\w、\W、\b、\B
re.X
通过给予我们功能灵活的格式以便更好的理解正则表达式
1 2 3 4 5 6 7 8 9 10 11 12 13 14 15 16 17 18 19 20 21 import retext = """ <12 > <x yz> <!@#$%> <1a!# e2> <> """ ret = re.findall("<.*?>" , text) ret = re.findall("<.*?>" , text, re.S) print (ret)
场景
正则表达式
用户名
^[a-z0-9_-]{3,16}$
密码
^[a-z0-9_-]{6,18}$
手机号码
^(?:\+86)?1[3-9]\d{9}$
颜色的十六进制值
`^#?([a-f0-9]{6}
电子邮箱
^[a-z\d]+(\.[a-z\d]+)*@([\da-z](-[\da-z])?)+\.[a-z]+$
URL
`^(?:https://
IP 地址
`((2[0-4]\d
HTML 标签 ^<([a-z]+)([^<]+)*(?:>(.*)<\/\1>
utf-8编码下的汉字范围
^[\u2E80-\u9FFF]+$
BS4 简介 简单来说,Beautiful Soup是python的一个库,最主要的功能是从网页抓取数据。官方解释如下:
Beautiful Soup提供一些简单的、python式的函数用来处理导航、搜索、修改分析树等功能。
Beautiful Soup 是一个可以从HTML或XML文件中提取数据的Python库.它能够通过你喜欢的转换器实现惯用的文档导航,查找,修改文档的方式.Beautiful Soup会帮你节省数小时甚至数天的工作时间.你可能在寻找 Beautiful Soup3 的文档,Beautiful Soup 3 目前已经停止开发,官网推荐在现在的项目中使用Beautiful Soup 4。
官方文档: https://beautifulsoup.readthedocs.io/zh_CN/v4.4.0/
导入模块
1 2 3 from bs4 import BeautifulSoup
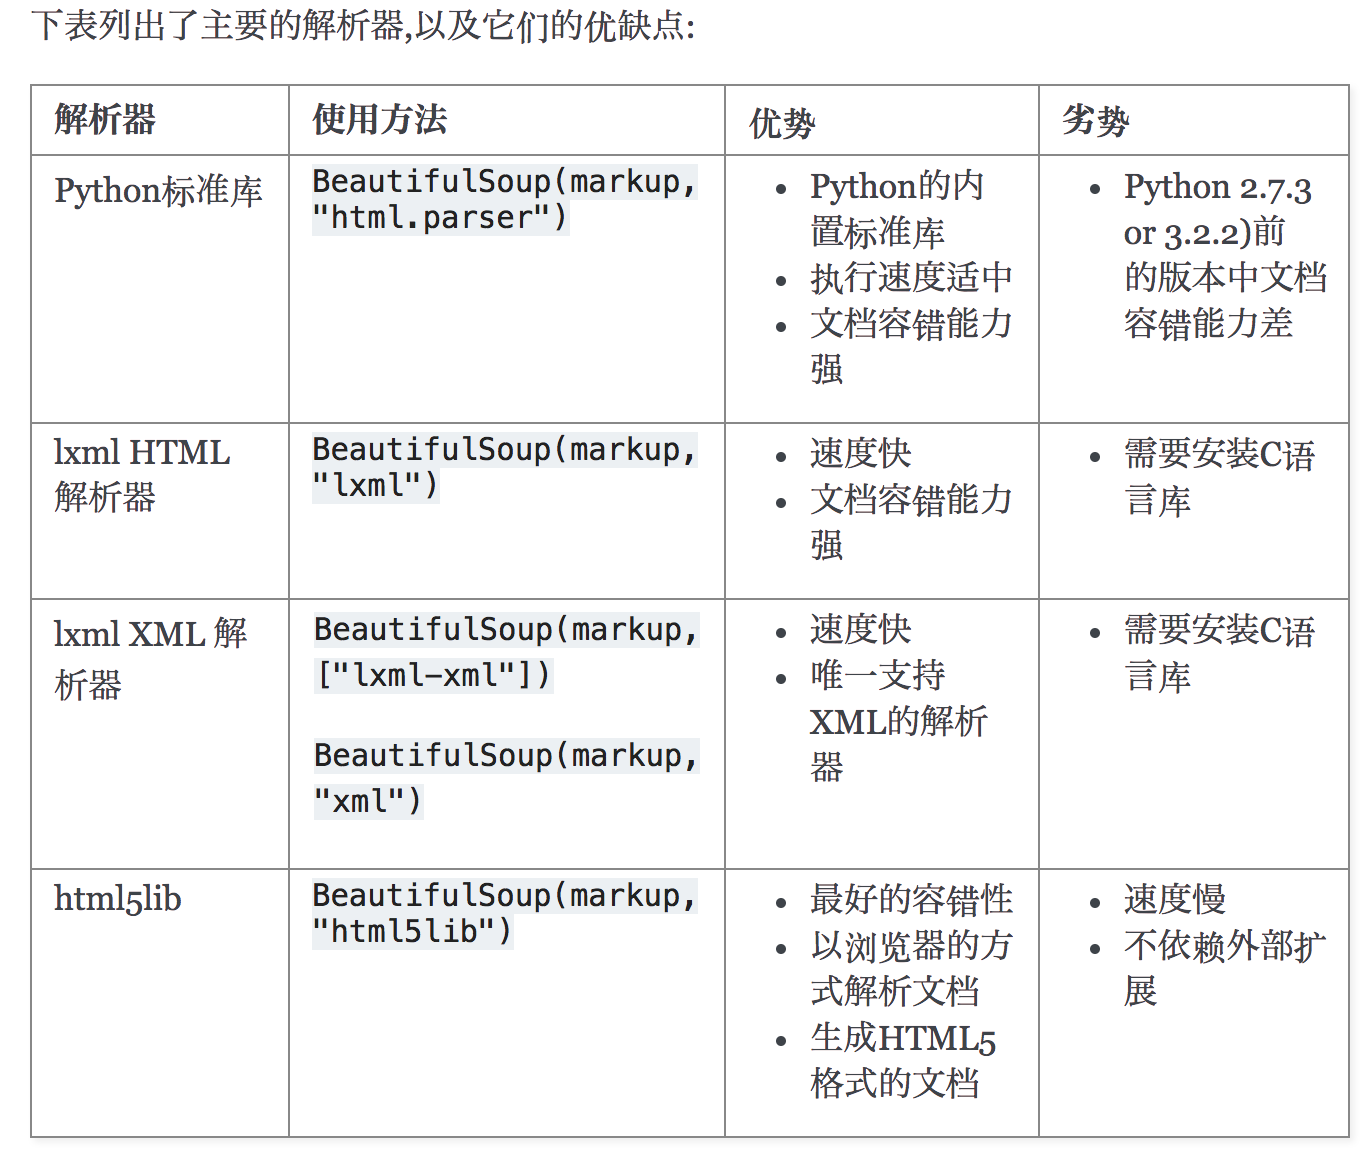
Beautiful Soup支持Python标准库中的HTML解析器,还支持一些第三方的解析器,如果我们不安装它,则 Python 会使用 Python默认的解析器,lxml 解析器更加强大,速度更快,推荐安装。
另一个可供选择的解析器是纯Python实现的 html5lib , html5lib的解析方式与浏览器相同,可以选择下列方法来安装html5lib:
解析器对比:
简单使用:
从一个soup对象开始,以下两种方式生成一个soup对象
1 2 3 from bs4 import BeautifulSoupsoup = BeautifulSoup(open ("index.html" )) soup = BeautifulSoup("<html>data</html>" )
构造soup对象时,可以传入解析器参数,如果不传入的话,会以最好的方式去解析
下面的一段HTML代码将作为例子被多次用到.这是 爱丽丝梦游仙境的 的一段内容(以后内容中简称为 爱丽丝 的文档):
1 2 3 4 5 6 7 8 9 10 11 12 13 html_doc = """ <html><head><title>The Dormouse's story</title></head> <body> <p class="title"><b>The Dormouse's story</b></p> <p class="story">Once upon a time there were three little sisters; and their names were <a href="http://example.com/elsie" class="sister" id="link1">Elsie</a>, <a href="http://example.com/lacie" class="sister" id="link2">Lacie</a> and <a href="http://example.com/tillie" class="sister" id="link3">Tillie</a>; and they lived at the bottom of a well.</p> <p class="story">...</p> """
使用BeautifulSoup解析这段代码,能够得到一个 BeautifulSoup 的对象
1 2 from bs4 import BeautifulSoupsoup = BeautifulSoup(html_doc, 'html.parser' )
从文档中找到所有标签的链接:
1 2 for link in soup.find_all('a' ): print (link.get('href' ))
从文档中获取所有文字内容:
四种对象 Beautiful Soup将复杂HTML文档转换成一个复杂的树形结构,每个节点都是Python对象,所有对象可以归纳为4种BeautifulSoup, Tag , NavigableString , Comment
tag对象,同网页中的标签 的意思
1 2 3 4 5 6 7 8 9 10 11 12 13 14 15 16 17 18 19 20 21 22 23 24 25 26 27 28 29 30 31 32 33 34 35 36 37 38 39 40 41 42 43 44 45 46 47 48 49 50 51 52 53 54 55 56 57 58 59 60 from bs4 import BeautifulSouphtml_doc = """ <html><head><title>The Dormouse's story</title></head> <body> <p class="title"><b>The Dormouse's story</b></p> <p class="story">Once upon a time there were three little sisters; and their names were <a href="http://example.com/elsie" class="sister" id="link1">Elsie</a>, <a href="http://example.com/lacie" class="sister" id="link2">Lacie</a> and <a href="http://example.com/tillie" class="sister" id="link3">Tillie</a>; and they lived at the bottom of a well.</p> <p class="story">...</p> """ soup = BeautifulSoup(html_doc, 'html.parser' ) print (soup.head, type (soup.head))print (soup.title, type (soup.title))print (soup.a, type (soup.a)) print (soup.p.b)print (soup.a.name) print (soup.p.b.name) print (soup.a["href" ])print (soup.a.attrs)''' 三、 HTML 4定义了一系列可以包含多个值的属性.在HTML5中移除了一些,却增加更多. 最常见的多值的属性是 class (一个tag可以有多个CSS的class). 还有一些属性 rel , rev , accept-charset , headers , accesskey . 在Beautiful Soup中多值属性的返回类型是list ''' print (soup.a["class" ]) print (soup.p.string) print (soup.p.strings) for i in soup.p.strings: print (i) p2 = soup.find_all("p" )[1 ] print (p2.string)print (p2.strings)for i in p2.strings: print (i) print (soup.p.string)print (soup.p.text) print (p2.text)
这种情况下,会产生Comment对象
1 2 3 4 5 markup = "<b > </b > " soup = BeautifulSoup(markup,"html.parser") comment = soup.b.string print(comment) print(type(comment))
结果为:
1 2 Hey, buddy. Want to buy a used parser? <class
我们可以看到这时候.string返回的对象不再是bs4.element.NavigableString,而是Comment
遍历文档树(导航文档树) 1 2 3 4 5 6 7 8 9 10 11 12 13 14 15 16 17 18 19 20 21 22 23 24 25 26 27 28 29 30 31 32 33 34 35 36 37 38 39 40 41 42 43 44 45 46 47 from bs4 import BeautifulSouphtml_doc = """ <html><head><title>The Dormouse's story</title></head> <body> <p class="title"><b>The Dormouse's story</b></p> <p class="story">Once upon a time there were three little sisters; and their names were <a href="http://example.com/elsie" class="sister" id="link1">Elsie</a>, <a href="http://example.com/lacie" class="sister" id="link2">Lacie</a> and <a href="http://example.com/tillie" class="sister" id="link3">Tillie</a>; and they lived at the bottom of a well.</p> <p class="story">...</p> """ soup = BeautifulSoup(html_doc, 'html.parser' ) print (soup.head.title.text)print (soup.body.a.text)print (soup.p.contents) print (soup.p.children) for i, child in enumerate (soup.p.children, 1 ): print (i, child) print (soup.p.descendants) for i, child in enumerate (soup.p.descendants, 1 ): print (i, child) for i, child in enumerate (soup.find_all("p" )[1 ].descendants, 1 ): print (i, child) print (soup.a.parent) print (soup.a.parent.text) print (soup.a.parents) print ("===" )print (soup.a.next_sibling) print (soup.a.next_sibling.next_sibling)print (soup.a.previous_sibling.previous_sibling)print (soup.a.previous_siblings)
搜索文档树
recursive 是否从当前位置递归往下查询,如果不递归,只会查询当前soup文档的子元素
string 这里是通过tag的内容来搜索,并且返回的是类容,而不是tag类型的元素
**kwargs 自动拆包接受属性值,所以才会有soup.find_all('a',id='title') ,id=’title’为**kwargs自动拆包掺入
BeautifulSoup定义了很多搜索方法,这里着重介绍2个: find() 和 find_all() .其它方法的参数和用法类似
参数列表解读
1 find_all( name , attrs , recursive , string , **kwargs )
1 2 3 4 5 6 7 8 9 10 11 12 13 14 15 16 17 18 19 20 21 soup = BeautifulSoup(html_doc, 'lxml' ) print (soup.find_all(name='a' ))print (soup.find_all(name=re.compile ('^b' ))) print (soup.find_all(name=['a' , 'b' ]))def has_class_but_no_id (tag ): return tag.has_attr('class' ) and tag.has_attr('id' ) print (soup.find_all(name=has_class_but_no_id))
如果一个指定名字的参数不是搜索内置的参数名,搜索时会把该参数当作指定名字tag的属性来搜索,如果包含一个名字为 id 的参数,Beautiful Soup会搜索每个tag的”id”属性.
1 2 3 4 5 6 7 8 print (soup.find_all(href="http://example.com/tillie" ))print (soup.find_all(href=re.compile ("^http://" )))print (soup.find_all(id =True )) print (soup.find_all(href=re.compile ("http://" ), id ='link1' ) print (soup.find_all("a" , class_="sister" )) print (soup.find_all("a" ,attrs={"href" : re.compile ("^http://" ), "id" : re.compile ("^link[12]" )})) data_soup.find_all(attrs={"data-foo" : "value" })
1 2 3 4 5 6 7 8 9 10 11 import reprint (soup.find_all(text="Elsie" ))print (soup.find_all(text=["Tillie" , "Elsie" , "Lacie" ]))print (soup.find_all(text=re.compile ("Dormouse" )))
find_all() 方法返回全部的搜索结构,如果文档树很大那么搜索会很慢.如果我们不需要全部结果,可以使用 limit 参数限制返回结果的数量.效果与SQL中的limit关键字类似,当搜索到的结果数量达到 limit 的限制时,就停止搜索返回结果.
1 print (soup.find_all("a" ,limit=2 ))
调用tag的 find_all() 方法时,Beautiful Soup会检索当前tag的所有子孙节点,如果只想搜索tag的直接子节点,可以使用参数 recursive=False
1 find( name , attrs , recursive , string , **kwargs )
find_all() 方法将返回文档中符合条件的所有tag,尽管有时候我们只想得到一个结果.比如文档中只有一个
标签,那么使用 find_all() 方法来查找标签就不太合适, 使用 find_all 方法并设置 limit=1 参数不如直接使用 find() 方法.下面两行代码是等价的:
1 2 3 4 5 soup.find_all('title' , limit=1 ) soup.find('title' )
唯一的区别是 find_all() 方法的返回结果是值包含一个元素的列表,而 find() 方法直接返回结果.find_all() 方法没有找到目标是返回空列表, find() 方法找不到目标时,返回 None .
soup.head.title 是 tag的名字 方法的简写.这个简写的原理就是多次调用当前tag的 find() 方法:
1 2 3 4 5 soup.head.title soup.find("head" ).find("title" )
1 2 3 4 5 6 7 8 9 10 11 12 13 14 15 16 17 18 19 20 21 22 23 24 25 26 27 28 29 30 31 32 33 34 35 36 37 38 39 40 41 42 43 44 45 46 47 a_string = soup.find(text="Lacie" ) print (a_string) print (a_string.find_parent())print (a_string.find_parents())print (a_string.find_parent("p" ))''' <p class="story"> Once upon a time there were three little sisters; and their names were <a class="sister" href="http://example.com/elsie" id="link1">Elsie</a>, <a class="sister" href="http://example.com/lacie" id="link2">Lacie</a> and <a class="sister" href="http://example.com/tillie" id="link3">Tillie</a>; and they lived at the bottom of a well. </p> ''' ''' 这2个方法通过 .next_siblings 属性对当tag的所有后面解析的兄弟tag节点进行迭代, find_next_siblings() 方法返回所有符合条件的后面的兄弟节点, find_next_sibling() 只返回符合条件的后面的第一个tag节点. ''' first_link = soup.a print (first_link.find_next_sibling("a" ))print (first_link.find_next_siblings("a" ))''' [<a class="sister" href="http://example.com/lacie" id="link2">Lacie</a>, <a class="sister" href="http://example.com/tillie" id="link3">Tillie</a> ] ''' ''' 这2个方法通过 .next_elements 属性对当前tag的之后的tag和字符串进行迭代, find_all_next() 方法返回所有符合条件的节点, find_next() 方法返回第一个符合条件的节点: ''' first_link = soup.a print (first_link.find_all_next(string=True ))print (first_link.find_next(string=True ))
Css选择器
css选择器的方法为select(css_selector)https://www.w3school.com.cn/cssref/css_selectors.ASP
1 2 3 4 5 6 7 8 9 10 11 12 13 14 15 16 17 18 19 20 21 22 23 24 25 26 27 28 29 30 31 32 33 34 35 36 37 38 39 40 41 42 43 44 45 46 47 48 49 50 51 52 53 54 55 56 57 58 59 60 61 62 63 64 65 66 67 68 69 70 71 72 73 74 75 76 77 78 79 80 81 82 83 84 85 86 87 88 89 90 soup.select("title") # [<title > The Dormouse's story</title > ] soup.select("p nth-of-type(3)") # [<p class ="story" > ...</p > ] soup.select("body a") # [<a class ="sister" href ="http://example.com/elsie" id ="link1" > Elsie</a > , # <a class ="sister" href ="http://example.com/lacie" id ="link2" > Lacie</a > , # <a class ="sister" href ="http://example.com/tillie" id ="link3" > Tillie</a > ] soup.select("html head title") # [<title > The Dormouse's story</title > ] soup.select("head > title") # [<title > The Dormouse's story</title > ] soup.select("p > a") # [<a class ="sister" href ="http://example.com/elsie" id ="link1" > Elsie</a > , # <a class ="sister" href ="http://example.com/lacie" id ="link2" > Lacie</a > , # <a class ="sister" href ="http://example.com/tillie" id ="link3" > Tillie</a > ] soup.select("p > a:nth-of-type(2)") # [<a class ="sister" href ="http://example.com/lacie" id ="link2" > Lacie</a > ] soup.select("p > #link1") # [<a class ="sister" href ="http://example.com/elsie" id ="link1" > Elsie</a > ] soup.select("body > a") soup.select("#link1 ~ .sister") # [<a class ="sister" href ="http://example.com/lacie" id ="link2" > Lacie</a > , # <a class ="sister" href ="http://example.com/tillie" id ="link3" > Tillie</a > ] soup.select("#link1 + .sister") # [<a class ="sister" href ="http://example.com/lacie" id ="link2" > Lacie</a > ] soup.select(".sister") # [<a class ="sister" href ="http://example.com/elsie" id ="link1" > Elsie</a > , # <a class ="sister" href ="http://example.com/lacie" id ="link2" > Lacie</a > , # <a class ="sister" href ="http://example.com/tillie" id ="link3" > Tillie</a > ] soup.select("[class~=sister]") # [<a class ="sister" href ="http://example.com/elsie" id ="link1" > Elsie</a > , # <a class ="sister" href ="http://example.com/lacie" id ="link2" > Lacie</a > , # <a class ="sister" href ="http://example.com/tillie" id ="link3" > Tillie</a > ] soup.select("#link1") # [<a class ="sister" href ="http://example.com/elsie" id ="link1" > Elsie</a > ] soup.select("a#link2") # [<a class ="sister" href ="http://example.com/lacie" id ="link2" > Lacie</a > ] soup.select("#link1,#link2") # [<a class ="sister" href ="http://example.com/elsie" id ="link1" > Elsie</a > , # <a class ="sister" href ="http://example.com/lacie" id ="link2" > Lacie</a > ] soup.select('a[href]') # [<a class ="sister" href ="http://example.com/elsie" id ="link1" > Elsie</a > , # <a class ="sister" href ="http://example.com/lacie" id ="link2" > Lacie</a > , # <a class ="sister" href ="http://example.com/tillie" id ="link3" > Tillie</a > ] soup.select('a[href="http://example.com/elsie"]') # [<a class ="sister" href ="http://example.com/elsie" id ="link1" > Elsie</a > ] soup.select('a[href^="http://example.com/"]') # [<a class ="sister" href ="http://example.com/elsie" id ="link1" > Elsie</a > , # <a class ="sister" href ="http://example.com/lacie" id ="link2" > Lacie</a > , # <a class ="sister" href ="http://example.com/tillie" id ="link3" > Tillie</a > ] soup.select('a[href$="tillie"]') # [<a class ="sister" href ="http://example.com/tillie" id ="link3" > Tillie</a > ] soup.select('a[href*=".com/el"]') # [<a class ="sister" href ="http://example.com/elsie" id ="link1" > Elsie</a > ] multilingual_markup = """ <p lang ="en" > Hello</p > <p lang ="en-us" > Howdy, y'all</p > <p lang ="en-gb" > Pip-pip, old fruit</p > <p lang ="fr" > Bonjour mes amis</p > """ multilingual_soup = BeautifulSoup(multilingual_markup) multilingual_soup.select('p[lang|=en]') # [<p lang ="en" > Hello</p > , # <p lang ="en-us" > Howdy, y'all</p > , # <p lang ="en-gb" > Pip-pip, old fruit</p > ]
返回查找到的元素的第一个
使用bs4爬取豆瓣电影排行榜信息
1 2 3 4 5 6 7 8 9 10 from bs4 import BeautifulSoupsoup = BeautifulSoup(s, 'html.parser' ) s=soup.find_all(class_="item" ) for item in s: print (item.find(class_="pic" ).a.get("href" )) print (item.find(class_="pic" ).em.string) print (item.find(class_="info" ).contents[1 ].a.span.string) print (item.find(class_="info" ).contents[3 ].contents[3 ].contents[3 ].string) print (item.find(class_="info" ).contents[3 ].contents[3 ].contents[7 ].string)
3.3、xpath xpath在Python的爬虫学习中,起着举足轻重的地位,对比正则表达式 re两者可以完成同样的工作,实现的功能也差不多,但xpath明显比re具有优势,在网页分析上使re退居二线。
xpath 全称为XML Path Language 一种小型的查询语言
可在XML中查找信息
支持HTML的查找
通过元素和属性进行导航
python开发使用XPath条件: 由于XPath属于lxml库模块,所以首先要安装库lxml。
1 2 3 from lxml import etreeselector=etree.HTML(源码) selector.xpath(表达式)
路径表达式
表达式
描述
实例
解析
/
从根节点选取
/body/div[1]选取根结点下的body下的第一个div标签
//
从匹配选择的当前节点选择文档中的节点,而不考虑它们的位置
//a选取文档中所有的a标签
./
当前节点再次进行xpath
./a选取当前节点下的所有a标签
@
选取属性
//@calss选取所有的class属性
** 谓语(Predicates)** 谓语用来查找某个特定的节点或者包含某个指定的值的节点。
谓语被嵌在方括号中。
在下面的表格中,我们列出了带有谓语的一些路径表达式,以及表达式的结果:
路径表达式
结果
/ul/li[1]
选取属于 ul子元素的第一个 li元素。
/ul/li[last()]
选取属于 ul子元素的最后一个 li元素。
/ul/li[last()-1]
选取属于 ul子元素的倒数第二个 li元素。
//ul/li[position()<3]
选取最前面的两个属于 ul元素的子元素的 li元素。
//a[@title]
选取所有拥有名为 title的属性的 a元素。
//a[@title=’xx’]
选取所有 a元素,且这些元素拥有值为 xx的 title属性。
//a[@title>10] > < >= <= !=
选取 a元素的所有 title元素,且其中的 title元素的值须大于 10。
/body/div[@price>35.00]
选取body下price元素值大于35的div节点
选取未知节点 XPath 通配符可用来选取未知的 XML 元素。
通配符
描述
*
匹配任何元素节点。
@*
匹配任何属性节点。
node()
匹配任何类型的节点。
实例
在下面的表格中,我们列出了一些路径表达式,以及这些表达式的结果:
路径表达式
结果
/ul/*
选取 bookstore 元素的所有子元素。
//*
选取文档中的所有元素。
//title[@*]
选取所有带有属性的 title 元素。
//node()
获取所有节点
选取若干路径 通过在路径表达式中使用“|”运算符,您可以选取若干个路径。
实例
在下面的表格中,我们列出了一些路径表达式,以及这些表达式的结果:
路径表达式
结果
//book/title | //book/price
选取 book 元素的所有 title 和 price 元素。
//title | //price
选取文档中的所有 title 和 price 元素。
/bookstore/book/title | //price
选取属于 bookstore 元素的 book 元素的所有 title 元素,以及文档中所有的 price 元素。
逻辑运算
1 2 //div[@id ="head" and @class ="s_down" ] //title | //price
属性查询
1 2 3 4 //div[@id ] //div[@id ="maincontent" ] //@class //li[@name="xx" ]//text()
获取第几个标签 索引从1开始
1 2 3 tree.xpath('//li[1]/a/text()' ) tree.xpath('//li[last()]/a/text()' ) tree.xpath('//li[last()-1]/a/text()' )
模糊查询
1 2 3 4 5 6 7 8 9 10 11 //div[contains(@id , "he" )] //div[starts-with (@id , "he" )] //div/h1/text() //div/a/@href //* //*[@class ="xx" ] c = tree.xpath('//li/a' )[0 ] result=etree.tostring(c, encoding='utf-8' ) print (result.decode('UTF-8' ))
案例 豆瓣Top250基于xpath解析:
1 2 3 4 5 6 7 8 9 10 11 12 13 14 15 16 17 18 import requestsfrom lxml import etreeurl = "https://movie.douban.com/top250?start=0" headers = { "User-Agent" : "Mozilla/5.0 (Windows NT 10.0; Win64; x64) AppleWebKit/537.36 (KHTML, like Gecko) Chrome/99.0.4844.82 Safari/537.36" } resp = requests.get(url, headers=headers) tree = etree.HTML(resp.text) items = tree.xpath('//li/div[@class="item"]/div[@class="info"]' ) for item in items: title = item.xpath('./div[@class="hd"]/a/span[1]/text()' )[0 ] rating_num = item.xpath('./div[@class="bd"]/div[@class="star"]/span[@class="rating_num"]/text()' )[0 ] comment_num = item.xpath('./div[@class="bd"]/div[@class="star"]/span[4]/text()' )[0 ] print (title, rating_num, comment_num)